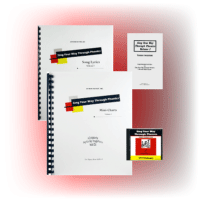


Recognizing Capital Letters Lesson Plan
Alphabet Letters
- Students will learn to recognize the capital letters of the alphabet when seeing the letters in print.
- Students will learn how to write the capital letters of the alphabet with the help of musical rhymes.
When you first started school, were you surprised to learn that “elemeno” was not one letter but actually four different letters--L, M, N, and O? If you had that common experience, it’s because you learned the ABCs by rote, without linking letter names to the shapes of the individual letters. In this lesson plan, the song Alphabet Letters addresses the issue of recognizing capital letters by linking letter shapes to familiar objects. Examples: Letter C looks like and ear, S looks like a snake, M looks like two mountain tops. Every time students sing the song Alphabet Letters, they reinforce capital letter recognition by pointing to letters and objects in the corresponding Mini-Charts. For additional reinforcement, students can trace the shapes of the letters and objects with their fingers as they sing or participate in activities in the Follow-Up and Extensions sections of this lesson plan. With daily practice, students can learn to recognize and write the entire capital letter alphabet within a few weeks. Once the basic song is learned and students can sing alone with the CD’s instrumental track, they are ready to learn the lower-case letters with the song, Little Partners. The capital and lower-case letters can also be reinforced with the Read-and-Sing books, Alphabet Letters and Little Partners.
- Sing Your Way Through Phonics Volume 1 CD, Tracks 1 and 2 (Listen to audio sample)
- Sing Your Way Through Phonics Volume 1 Mini-Charts (pp. 1-14)
- Optional: props: wet sand, chalkboard and wet eraser, finger paint, shaving cream, pudding
Note: If you do not have the CD or Mini-Charts, you can still teach this capital letters lesson plan using the folk tune listed on the Alphabet Letters Song Lyrics page. You can create your own mini-charts using the words in bold print letters in each verse of the Song Lyrics.
Find out more about Sing Your Way Through Phonics products.
Order our cost-saving Volume 1 Combo online.
- Say, “Today, we are going to look carefully at letter shapes.”
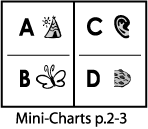
- Display Mini-Charts pp. 2-14.
- Point to the tee-pee on page 2 and say, “This picture of a tee-pee shows a kind of tent that Native Americans used. What letter is shaped like a teepee?” (Capital A) With your finger, trace up and down the sides of the teepee and the letter A, saying, “Yes, they both have a shape that goes up-and-down.”
- With your hand, cover the left half of the butterfly picture and say, “When I show you this part of the butterfly, what letter does it look like?” (Capital B) With your finger, trace the two loops of the butterfly’s right wing and the two loops of the letter B, saying, “Yes, the butterfly has two loops on its wing and the letter B also has two loops.”
- Say, “Now, put your finger at the top of your ear and trace along the outside until you reach the bottom of your ear. Do you see a letter that is shaped like your ear?” (Capital C). With your finger, trace along the shape of the ear illustration and the letter C on page 3, saying, “Yes, an ear is like a half circle and so is the letter C.”
- Point to the broken cookie on page 3 and say, “This used to be a whole cookie, but look what happened to this cookie when it was broken. Now it looks like the letter next to it. What is the letter that looks like a broken cookie?” (Capital D) If desired, this can be demonstrated with a real cookie.
- Say, “Let’s listen to a song that tells about these letters and shapes.” Play CD Track 1 while pointing to the letters and pictures on pages 2-3, tracing the shapes with your finger as in the steps above. Pause the CD player after the letter D.
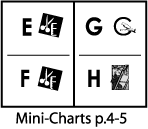
- Ask, “Have you ever seen a comb that is missing some teeth?” Point to the picture of the comb on page 4 and say, “This comb has only three teeth left. What letter does it look like?” (Capital E) Pointing to the next picture, say, “And this comb has only two teeth left. What letter does it look like?” (Capital F)
- Say, “Remember the letter C that looks like an ear? What letter on this page looks like a letter C that is holding up a little stick?” (Capital G)
- Point to the picture of the ladder and ask, “How many steps do you see on this funny little ladder?” (one) “What letter looks like a ladder that has just one step?” (Capital H)
- Say, “Let’s listen to the part of the song that tells about these letters and shapes.” Continue playing CD Track 1 while pointing to the letters and pictures on pages 4-5, tracing the shapes with your finger as in the steps above. Pause the CD player after the letter H.
- Say, “Would you like to sing the song with me? Let’s give it a try. When I trace the shapes on the page, you trace the shapes in the air with your finger.” Play and sing along with CD Track 1 from the beginning, pausing after the letter H. If students are very unfamiliar with the letters covered thus far, the lesson may be continued on the following day, being sure to review the previous day’s letters and shapes before proceeding with new pages.
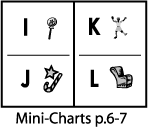
- On Mini-Chart page 6, point to the two pictures and say, “I have pictures of two kinds of candy on this page, a sucker [or lollipop] and a candy cane.” Use your finger in the air to draw the shape of the stick on the sucker. Now use your finger in the air to draw the shape of the candy cane. Pointing to the letter I, say, “Does capital I look like the sucker stick or the candy cane?” (sucker stick) “Does capital J look like the sucker stick or the candy cane?” (candy cane)
- Point to the letter K on page 7 and say, “Can you put two arms up and two legs down like the letter K?” Allow students to form this shape with their bodies.
- Say, “Look at this chair that is sitting on the ground. It looks like the letter L. Can you sit on the floor and make your bodies into the shape of capital L?” Allow students to sit on floor with feet straight out in front.
- Say, “Let’s sing about the four letters and shapes on these pages.” Play CD Track 1 beginning with letter I. Pause CD player after the letter L. If students are very unfamiliar with the letters covered thus far, the lesson may be continued on the following day, being sure to review the previous days’ letters and shapes before proceeding with new pages.
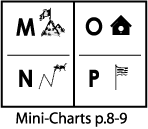
- Trace the mountain tops on Mini-Chart pages 8-9 and say, “Look at the shape of these mountains. They go up-down-up-and down. So does the letter M. Can you trace the shape in the air?” Trace the shape while saying, “Up, down, up, and down.”
- Say, “Now, look at this grasshopper. I’ll trace his jump and you say whether he is going up or down. (up-down-up) That is the shape of the capital N. Can you say, ’Up-down-up,’ as I trace the letter N? Now try it with me.” Trace the letter while students describe the direction of motion and trace the pattern in the air.
- Say, “I see a letter that is just like a hole. What letter is that?” (Capital O) “Do you see a flag on a pole? What letter looks like a flag on a pole?” (Letter P) Point to the picture and say, “This is the flag; this is the pole.” Point to the letter P and say again, “This is the flag; this it the pole.”
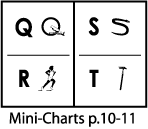
- Turn to Mini-Chart page 10 and say, “I see a letter that looks like O holding a little stick. Can you find it? What letter is that?” (Capital Q) Ask students to make a Q with their hands by first making an O (touching thumb and pointer finger) and then adding a stick (using pointer finger of the other hand). Remind them that this is the letter Q.
- Say, “I see see a picture of someone running. When we run, one of our legs sticks out in front. Can you make that shape with your leg?” Allow students to put one leg forward. “That is the shape of the letter R.” Point to the legs on the runner and on the letter R.
- Say, “Let’s hear how we can sing about these letters and pictures.” Continue playing CD Track 1. Pause CD player after the letter R. If students are very unfamiliar with the letters covered thus far, the lesson may be continued on the following day, being sure to review the previous days’ letters and shapes before proceeding with new pages.
- With pages 10-11 open, ask the students, “Who can find a letter that looks like a snake? What letter is it?” (Capital S) “And who can find a letter that looks like an upside-down rake?” (Capital T) Ask students to trace the shape of the snake in the air and to make the shape of a rake with their two hands (use pointer fingers or whole flattened hands).
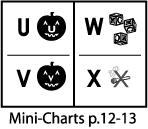
- Point to the pictures on Mini-Chart page 12 and say, “My two jack-o-lanterns have only one thing different. Can you find it?” (One nose is fat; the other is thin.) “Letter U is the fat nose. Can you make shape of the letter U with your hand?” (Cup the hand with thumb and fingers toward ceiling.) “Can you make the shape of the letter V just two fingers?” (make “victory” sign with pointer and middle finger)
- Point to the letter W on page 13 and say, “This letter W looks like another letter standing on its head. Can you find that letter on the blocks?” (Letter M). Practice making the letter M with the three middle fingers of one hand, then flipping it toward the ceiling to form the letter W.
- Point to the letter X and say, “The letter X goes crisscross. Sometimes we use the letter X to cross out something that we don’t want. What is the the letter X crossing out in this picture and what does it mean?” (no smoking) “Can you make the letter x with your fingers?” (cross index fingers)
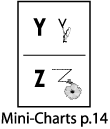
- Turn to Mini-Chart page 14 and say, “This is the letter Y. What letter does it look like it is holding up?” (Letter V) “And letter Z is a letter that zigs and zags like the flight of a bee. Can you make the zig-zag shape with me?” Say, “Zig-zag-zig” while tracing the shape of the letter Z and the flight of the bee in the illustration.
- Say, “Now let’s hear the rest of our Alphabet song.” Play and sing along with CD Track 1 from letter S to the end of the song, tracing the letters and shapes with your finger and encouraging the students to trace the shapes in the air.
- Say, “Tomorrow, we’ll try the whole song from beginning to end.”
- Practice singing Alphabet Letters daily for a few weeks. Allow some of the students be the leaders, tracing the letters and pictures with their fingers as they sing. For every set of facing pages, choose 1-2 students to be the tracing leaders.
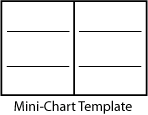
- Using the instrumental version (Track 2) and the Mini-Chart templates, allow students to print each of the capital letters and point and trace these as they sing. Students may also wish to illustrate their letters with their own versions of the coordinating illustrations.
- Allow students to “read” the Mini-Charts from back to front to provide additional practice in identifying letters. Example: Letter Z goes zig-zag-zig, Y’s a stick that holds a V, X goes criss-and-cross, you see, etc.
- Find and capital letters in the environment: Stop sign, Exit sign, store signs, newspaper headlines and ads, brand names on clothing and appliances.

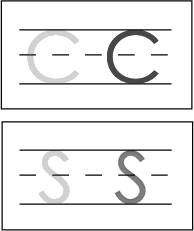
- Introduce the Read-and-Sing Book, Alphabet Letters. Help students trace the shapes of the letters hidden in the book’s illustrations. Keep a few copies of the book at a literacy center equipped with headsets so that students can gain practice in listening, singing, and tracing the capital letters.
- Group students into sets of partners and have them “draw” capital letters on their partner’s back. The partner then identifies the letter and the process is reversed. This activity guides students to notice the shapes of the letters, whether they are the person doing the drawing or deciphering the drawing.
- Create laminated template cards with one capital letter printed on headline, midline, and baseline. Have the students form long snakes out of clay. First they place their “snakes” over the template letter. In the adjacent space, they can form the letter without using the template.
- Play What’s in the Bag? Place three or four plastic letters in a small brown bag or sock. Students must choose a letter by feel alone. Activity 1: Name a letter and ask the student to withdraw that letter without looking. Activity 2: The student places his/her hand in the bag and finds one letter. S/he tries to identify it and then withdraws the letter to check. This is a good game to be played with partners at learning centers.
- Read other Alphabet books that emphasize the shapes of letters such as Alphabatics by Suze MacDonald or Alphabet City by Steven T. Johnson. Compare the shapes made by the letters in these books with those in the song Alphabet Letters.
- Students correctly identify all the letters on Mini-Charts pp.1-14 in random order
- Students print all the capital letters or create the letters with other media such as clay, finger paints, or wet sand.
